

Managing Users
This guide covers all common user management tasks: creating new accounts, editing existing ones, enabling or disabling access, and deleting users.
Path: Settings → Users
Create a user
Open the Users section
Go to Settings → Users.
Open the creation dialog
Click the Add User button in the toolbar. The Create User dialog opens.
Personal details
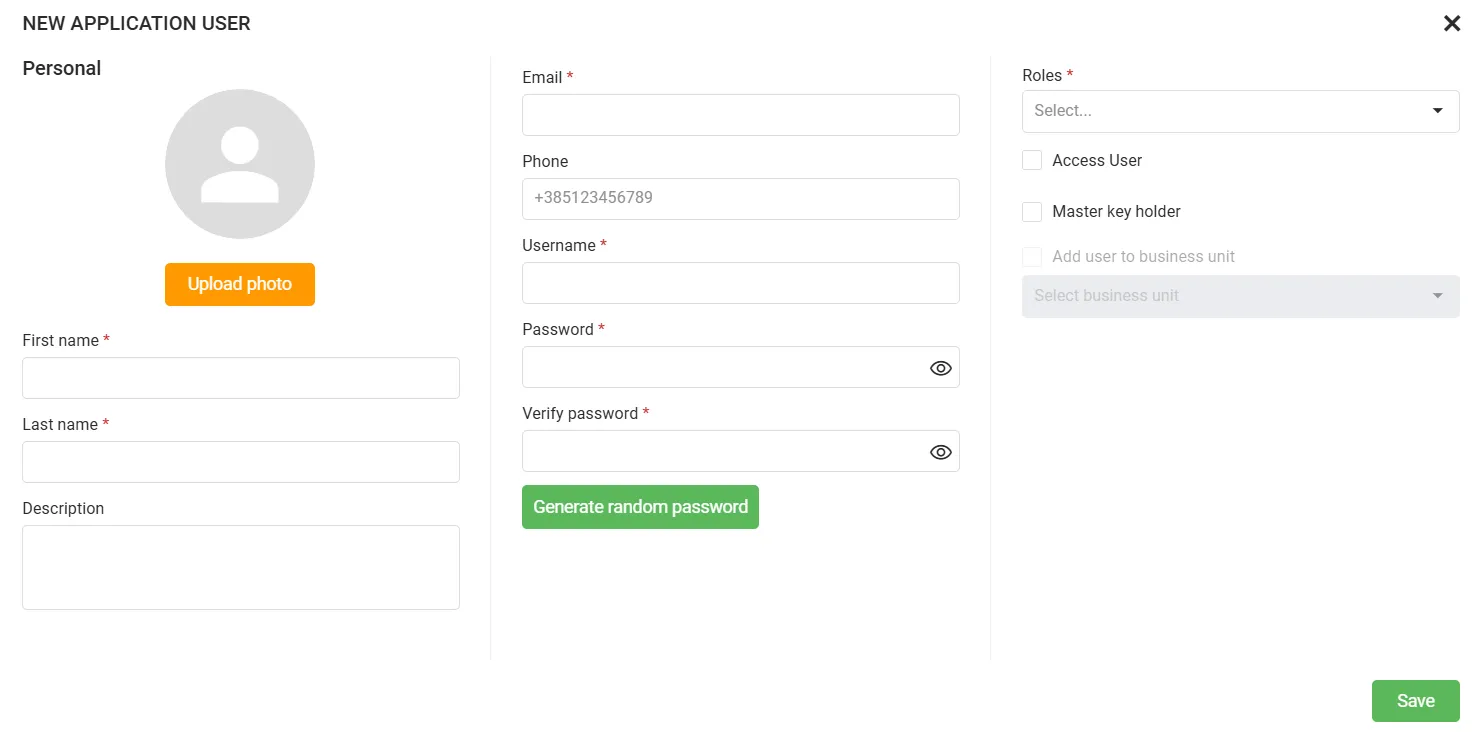
| Field | Required | Description |
|---|---|---|
| First name | Yes | The user’s first name |
| Last name | Yes | The user’s last name |
| Description | No | Optional notes about the user |
You can also upload a profile photo using the Upload photo button.
Account credentials
| Field | Required | Description |
|---|---|---|
| Yes | Must be unique. Used for email notifications and login | |
| Phone | No | International format (e.g. +385123456789). Used for SMS and voice notifications |
| Username | Yes | Must be unique. Cannot be changed for Active Directory accounts |
| Password | Yes | Must meet any configured password complexity requirements |
| Verify password | Yes | Repeat the password to confirm |
Click Generate random password to have Supracontrol create a secure password automatically.
Roles and access
| Field | Required | Description |
|---|---|---|
| Roles | Yes | Select one or more roles. The highest-level role determines the user’s effective permissions. See Users and Roles for a full description |
| Access User | No | Tick to grant this user access to the Access Control module |
| Master key holder | No | Grants this user master key access rights |
| Add user to business unit | No | Tick to assign the user to a Business Unit, then select the BU from the dropdown |
Save
Click Save to create the account. The new user can log in immediately after creation (provided the account is enabled and within its validity period).
Edit a user
Select the user
Click the user’s row in the table to select it.
Open the edit dialog
Click the Edit button in the toolbar, or double-click the row. The edit dialog opens with the same tabs as the create dialog.
Make changes and save
Modify any fields across the tabs and click Save to apply the changes.
Enable a user
A disabled user cannot log in. To re-enable an account:
Select the user(s)
Select one or more disabled user rows in the table.
Enable
Click the Enable button in the toolbar. The selected accounts are immediately enabled with no confirmation dialog.
Disable a user
Disabling prevents a user from logging in without deleting their account or data.
Select the user(s)
Click one or more user rows in the table.
Disable
Click the Disable button in the toolbar. The selected accounts are immediately disabled.
Delete a user
Select the user
Click the user row you want to delete.
Delete and confirm
Click the Delete button in the toolbar. A confirmation dialog appears - click Confirm to permanently delete the user.
Deletion is permanent
The user’s account, login history, and personal settings are removed. Notifications and schedules created by the user are not automatically removed.
- Owner accounts cannot be deleted - the Owner role is protected to prevent accidental removal
- You cannot delete yourself
- You cannot delete the last Administrator - at least one must always remain
- Active Directory-linked accounts cannot be deleted from Supracontrol - remove them from Active Directory first, then sync
Assigning locations to a user
Locations determine which parts of the system a user can access. A user without any location assignments typically cannot see any devices, cameras, or sensors.
Open the user’s edit dialog and navigate to the Locations tab
Select the user and click Edit in the toolbar.
Select locations and optionally attach a schedule
Select one or more locations from the tree. Optionally, attach a schedule to each location to restrict access to specific time windows.
Save
Click Save to apply the location assignment.
Validity periods
To create a temporary user (e.g. a contractor or guest), set a Valid From and Valid Through date on the Advanced tab. The user can only log in between those dates. Once the validity period expires, the account behaves as if disabled - the user cannot log in, but the account and its data remain intact.